
- June 11, 2026
Your Titan just arrived. The box is sitting there, and you want to get in the water today. Then here’s good news for you: the full process from unboxing to first plunge takes about 30 to 60 minutes of actual work. And then you wait a few hours for the chiller to do its job. That is it.
This titan cold plunge setup guide walks you through every step, in order. Without any guesswork & hunting for a video that works. What you’ll get is just a clear path from a packed box to a relaxing titan cold plunge experience.
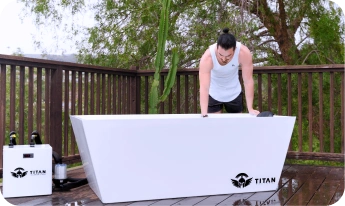
Step 1 : Titan Cold Plunge Unboxing
Before anything else, lay out every item from the box. Do not skip this step. A lot of people skip the part check and then realize 20 minutes into setup that something is missing. Check first.
What standard items are in your box:
- Cold plunge tub or shell
- Chiller unit (ships separately on some models, check both boxes)
- Inlet and outlet hoses
- Filter cartridge
- Drain plug
- Power cord
- QR code card for setup video
Note: The box may look beat up from shipping. That is normal. Titan packages the inside well. Check the actual components (not the box condition).If your package came with a QR code for a setup video, scan it. If the video has no sound, you don’t need to worry. Just contact support in that moment, they will guide you about everything you want to know. Anyway, this guide also covers every step in complete detail. Also check: if you ordered a chiller separately, it may arrive in a second box within a day of the tub. Both need to be on hand before you start the titan cold plunge installation.
Step 2 : Choosing the Right Placement
Where you put your Titan cold plunge matters more than most people think. Get this right and every session runs smoothly. Get it wrong and you are moving a filled tub later, which nobody wants.
The basics apply to both indoor and outdoor spots:
- Flat, stable surface that can support 800 to 1,000 lbs when filled with water and a person inside
- A concrete patio, reinforced deck, or solid garage floor all work well
- Leave at least 16 inches of space behind the unit to access the chiller and filter
- No extension cords. Use a dedicated outlet, as close as possible to where the unit sits
Titan Cold Plunge Indoor Setup
Indoor setups work well in garages, basements, and bathrooms with enough space.
- Ventilation matters. A running chiller releases heat, and splashing adds humidity. Make sure the room gets airflow.
- Protect the floor. Titan sells a neoprene mat for this. Even a basic rubber mat works to prevent water damage and slipping.
- Keep the outlet close. Titan chillers plug into a standard 110V outlet. No special wiring needed, but the cord should reach without stretching.
Titan Cold Plunge Outdoor Setup
Outdoor use is fully supported. Titan tubs are UV-resistant and built for outdoor conditions.
- Pick a shaded spot if you can. Direct sun makes the chiller work harder to maintain temperature.
- A concrete patio or solid flat deck is ideal. Avoid soft ground that shifts under weight.
- You still need a nearby GFCI outlet. More on that in the next step.
Step 3 : Titan Cold Plunge Chiller Setup and Filling
This is the most important part of your titan cold plunge setup. Take it step by step and you will have no issues.
- Position the tub first. Do not fill it yet. Get it exactly where you want it, then move the chiller unit next to it.
- Insert the filter cartridge. Slide it into the filter housing before connecting any hoses. Titan uses a 20-micron filtration system. The filter needs to be in place before water runs through it.
- Connect the hoses. There are two: one inlet and one outlet. The inlet pulls water from the tub into the chiller. The outlet returns chilled water back to the tub. Match the labels on both the tub and chiller. No twists, no loops.
- Fill the tub with water. Use a garden hose. Up to four or six inches from the very top, fill. Titan cold plunge fill times range from 10 to 20 minutes, though this can vary depending on water pressure. Make sure the tub is completely filled before turning on the chiller.
- Only use a GFCI outlet when plugging in. This is mandatory. When a GFCI outlet senses an electrical problem in close proximity to water, it immediately cuts power. A regular 110V outlet is sufficient for Titan chillers. While standard circuit breakers are sufficient, GFCI protection is required. Locate the little test and reset buttons on the face of the outlet to determine if it is GFCI-protected. Do not plug anything in until you have contacted an electrician if they are not present.
- Power on the chiller. Flip the switch, then press the on button. Set your target temperature. For your first session, set it to 55 to 60 degrees F (12 to 15 degrees C). Do not start at 37 degrees F right away.
- Keep an eye out for the chill cycle. A home freezer uses around the same amount of power as a Titan chiller, which is 280W. On the initial run, it takes three to six hours to reduce water from room temperature to the desired level. Prepare for this.
Titan’s Standard Chiller (1/3 HP) cools to 37 degrees F (3 degrees C). The Pro (1/2 HP) and Pro+ (1 HP) models cool faster and handle larger tubs. Check which chiller you have to know your cooling speed.
Step 4 : Before You Get In
The chiller has been running for a few hours. The water is cold. Before you step in, run through this quick checklist.
- Confirm temperature on the chiller display. If you do not have a display, use a basic water thermometer.
- Check all hose connections for any drips. Tighten by hand if needed.
- Place a towel and a warm layer within arm’s reach. Not on the floor across the room. Right next to the tub.
- Skip food for at least 30 minutes before a session.
- If you have a heart condition, Raynaud’s disease, or are pregnant, talk to a doctor before your first cold plunge.
One mental note: the urge to get out in the first 30 seconds is strong. That is the cold shock reflex, not danger. It passes.
Step 5 : Your Titan Cold Plunge First Session
This is your titan cold plunge first use guide. Follow this and your first session will go well.
Temperature
Start between 55 and 60 degrees F. Your body needs time to adapt. The benefits are still very real at this range. Dropping to 37 degrees on day one helps nobody.
Getting In
Step in slowly. Do not jump. Let your body register the cold for 10 seconds before you fully sit down. If you have a Triumph, Bravo, or Apex tub, the depth is built for full submersion up to the shoulders. You do not need to force it.
Breathing
Slow exhales through the mouth. That is the whole technique. Do not hold your breath. Do not hyperventilate. Just breathe out slowly and let your body settle. Around the one to two minute mark, most people feel a shift. The panic fades. A kind of calm takes over. That is the point.
How Long to Stay In
- Level 1: One to three minutes
- Level 2: Three to five minutes
- Advanced: Up to 10 minutes
When you’re stiff or shiver uncontrollably, don’t push past it. Either way, you should leave immediately.
After You Exit
Wait a few minutes for it to air dry, and then get a towel. Give your body time to rewarm naturally. You can speed things up by jumping into a hot shower right away. Reduce heat by 5 degrees on a weekly basis while increasing time by 1 to 2 minutes each session for the following several weeks. Nobody is in a hurry.
Quick Setup Reference
| Step | What to Know |
| Unboxing | Check all parts before anything else |
| Placement | Level surface, ventilation, non-slip mat |
| Electrical | GFCI outlet, no extension cords |
| Chiller connection | Tight hoses, filter wrench on casing |
| Fill the tub | 15 to 30 min via garden hose, no overflow |
| First chiller run | 3 to 6 hours to reach cold temperature |
| First session temp | 50 to 60 F for beginners |
| First session time | 1 to 3 minutes |
You Are Ready
Everything is set up. A chiller is operational. The water feels icy. With this titan cold plunge setup guide, you’ll be able to go straight from the box to your first session without the usual confusion.
Cold plunging compounds over time. Week one feels rough. By week four, it feels different. The setup you just did is the start of that.
If you’re looking to upgrade your current tub with a water cooler or are in the market for a new one, visit titan-wellness.com to browse Titan Wellness’s entire product catalog.
Commonly Asked Questions About Titan Cold Plunge
How long does titan cold plunge setup take step by step?
The physical setup takes 30 to 60 minutes. Unboxing, placing the unit, connecting hoses, filling the tub. Then you wait 3 to 6 hours for the chiller to cool the water. Total time from delivery to first session is usually half a day.
Can I use an extension cord with the chiller?
No. Never use an extension cord. Always plug directly into a wall GFCI outlet. Extension cords can cause voltage drops and create a fire or shock risk near water.
Do I need a plumber or electrician for titan cold plunge installation?
Not often. Any Titan chiller can be powered by a regular 110V wall outlet. But the thing is you should verify that the outlet you’re using is GFCI-protected. If it isn’t, a professional electrician can change the outlet in about half an hour.
How often should I change the water?
Every one to three months, the majority of users change the water. The water is kept clean by the continuous operation of the 20-micron filter. You can increase the water’s shelf life by adding a tiny bit of non-chlorine sanitizer.
RECENT BLOGS
- June 18, 2026
Titan Wellness Cold Plunge: Outdoor vs. Indoor Setup: What Works Better?

- June 13, 2026
Titan Cold Plunge Return Policy & Satisfaction Guarantee: Is It Worth It?

- June 12, 2026
How Long Should You Stay In A Cold Plunge As A Beginner?
- June 11, 2026
Titan Cold Plunge Setup Guide: From Unboxing to Your First Session

- June 9, 2026
Cold Plunge Temperature Guide: What Each Range Does to Your Body
More Blogs
Recent Blogs
Titan Wellness Cold Plunge: Outdoor vs. Indoor Setup: What Works Better?
June 18, 2026
Most people spend weeks researching the perfect cold plunge – and then spend five minutes
Read More
Titan Cold Plunge Return Policy & Satisfaction Guarantee: Is It Worth It?
June 13, 2026
Before buying any product that is a long-term investment, it is obvious to have doubts
Read More
How Long Should You Stay In A Cold Plunge As A Beginner?
June 12, 2026
Cold plunge is getting famous all over the world. Fitness influencers post about it and their experiences.
Read More
Titan Cold Plunge Setup Guide: From Unboxing to Your First Session
June 11, 2026
Your Titan just arrived. The box is sitting there, and you want to get in the water today.
Read More